Tuesday, October 8, 2013

Freezer Cooking #5 : Toddler/Baby Finger Foods


My "love" of freezer cooking comes from the simplicity of having an abundance of already-prepared food in the freezer that I can pull out at anytime and have dinner on the table in less than 20 minutes.   Freezer cooking really helps take the "stress" out of my everyday "whats for dinner"... because there is always something in the freezer we can eat!

Once our baby started eating finger foods, I knew I needed to use the same concept for his food- mass finger food cooking = 30+ meals in the freezer for him.

Of course I wanted to share what I made for him so you can do the same for your little ones!
I will go ahead and mention-- my LO has an allergy to cow's milk- so I use vegan cheese, rice or almond milk, vegan sour cream etc... in my recipes-- you can use regular cow's milk products in the same quantities I have listed.  I also try to buy as much organic for him as possible—but I don’t always—so even if it says organic or doesn’t say at all—you can use your own discretion.

Something I will also mention is that you will definitely need a mini muffin pan (or TWO) to make this freezer cooking easier-- I only had one, and probably could have saved myself a lot of time if I borrowed a neighbors! If you don’t have a mini muffin pan you can improvise with most of the recipes and just roll everything into a ball or patty.  For the muffin recipes you can utilize a regular sized muffin tin and cut them in half.

What's on the menu for your Little One?
  • Healthy Meatballs (24-32)
  • Mini Chicken Parmesan Cups (24)
  • Broccoli Cheese Patties (20)
  • Spinach Cups (20)
  • Mashed Potato Cups (24)
  • Blueberry Donut Muffins (30)
  • Apple Banana Muffins (24)
  • Sweet Potato Fries
Here is my grocery list: (don’t be alarmed! The list looks a bit long but most of the ingredients were already in my cabinet and are probably in yours! Everything in italics was already in my cabinet. Compare this list to your cabinets and cross out the items you won’t need to buy at the store. =) )
 Fresh Produce:
·         Small Sweet Onion (1)  
·         (2) Medium Sweet Potatoes
·         Cloves of Garlic (2)
·         4 Medium Potatoes
·         Large Apple (1)
·         Bananas (2)
·         Blueberries (1 cup)
·         Bag of Spinach
Meat:
·         1 Ib. Ground Organic Chicken (I bought breasts and ground myself)
·         1 Ib. Ground Organic Beef
Grocery:
·         Breadcrumbs (Italian & Regular)
·         Wheat Bran
·         Whole Wheat Organic Flour
·         Old Fashioned Oats
·         Small Jar Marinara Sauce
·         Basil, Oregano, Garlic Powder, Parsley
·         Cinnamon
·         Vegetable Oil
·         Baking Powder
·         Baking Soda
·         White Sugar
·         Brown Sugar
·         Salt
·         Pepper
·         Vanilla Extract
·         Baby food Purees (2 containers) – I use these since I have them leftover, you can use any other sort of vegetable puree or applesauce for this.
·         Gallon Sized Freezer Bags
·         Quart Sized Freezer Bags
Refrigerated:
·         Unsalted Butter (2 Tbsp)  (I use vegan soft spread)
·         Egg (9)
·         Milk (1 1/2 c) ( I use almond milk & rice milk)
·         Sour Cream (1 c) (I use vegan)
·         Mozzarella OR Parmesan Cheese (1/2 Cup) (I use Daiya brand vegan)
·         Cheddar Cheese (1 3/4 cup) (I use Daiya brand vegan)
Frozen:
·         Frozen Broccoli Florets (2 cups) thawed

Of course, once you get everything home and you are ready to cook put it on the counter and admire what you are about to do!! =)


I label everything with name and date BEFORE I start:
  • Healthy Meatballs (1 Quart Sized Bag)
  • Mini Chicken Parmesan Cups (1 Quart Sized Bag)
  • Broccoli Cheese Patties (1 Quart Sized Bag)
  • Spinach Cups (1 Quart Sized Bag)
  • Sweet Potato Fries (1 Quart Sized Bag)
  • Mashed Potato Cups (1 Gallon Sized Bag)
  • Blueberry Donut Muffins (1 Gallon Sized Bag)
  • Apple Banana Muffins (1 Gallon Sized Bag)
Now it’s time to get started! 
1) I decided to start with the “meat”:  Preheat Oven to 375
  • Finely Dice Small Onion and set aside (will need about ¼ c).   Mince (2) cloves garlic and set aside.
  • Get (2) Medium Sized Mixing Bowls out- put ground beef in one and ground chicken in the other.
  • Add the following to the ground beef bowl:  ½ cup wheat bran, ¼ cup breadcrumbs, ¼ tsp garlic powder, ½ tsp oregano, (2) containers baby food purees.
  • Add the following to the ground chicken bowl:  ½ of the minced garlic (already prepped), ¼ cup diced onion, 1 egg, ½ cup Italian breadcrumbs, ½ cup shredded mozzarella or parmesan cheese, ¾ cup marinara sauce, 1 tsp oregano.
  • Mix both mixtures (separately) well.   If needed, add more breadcrumbs so mixture sticks together well.
  • Spray mini-muffin pan with non-stick cooking spray.  Using a medium scoop- distribute chicken mixture evenly among 24 muffin cups.  (mixture will shrink during cooking so fill to top)
  • Spray baking sheet (with sides!) with non stick cooking spray.  Using your hands, roll beef mixture into meatballs (approx 1.5 inch) – should make approx 24-30.  You can keep these fairly close together on the baking sheet, they do not expand.
  • Place chicken bites & meatballs in oven- bake for 15-20 min, or until cooked through and golden brown.
2) Next I did the “vegetables”:
  • Wash & Peel the sweet potatoes and regular potatoes.  Cut the sweet potatoes into skinny “fries”.  Place on greased Large Cookie Sheet and toss in a small amount of olive oil- make sure they are not overlapping much.  Set aside.
  • Cut the regular potatoes into “chunks” and place in microwave in covered microwave safe dish for 8 minutes.
  • By now your meat should be out of the oven cooling- I typically pop everything off the pans and onto cooling racks.
  • Increase oven temp to 450 and place prepared Sweet Potatoes in oven.  Bake 15 minutes, then “flip” fries and bake 10-15 more minutes.
  • Check potatoes in microwave- if soft, remove.  You may need to add 2-3 more minutes cooking time if not soft.  Transfer soft potatoes to mixing bowl- mash a bit with a hand masher or with a wooden spoon.  Add the following to the potato mixture:  ½ cup cheddar cheese, 2 eggs, ½ cup milk (I used rice milk), ½ cup sour cream.  Using hand mixer- blend well.  Grease mini muffin pan, transfer heaping scoops into each muffin cup.  Set Aside
  • Wash Spinach and place in food processor.  (I had to process in 4 batches)  Put finely chopped spinach in mixing bowl and add:  ½ c sour cream, ½ c cheddar cheese, sprinkle of pepper, 2 eggs and the rest of the minced garlic.  Mix well.  Place mixture in greased mini muffin pan.
  • By now the sweet potato fries should be done.  Reduce oven temp to 350 and place mashed potato bites and spinach cups in oven.  Bake 15-20 minutes or until golden.
  • Now to start the last vegetable item:  Place thawed broccoli in food processor- finely chop and transfer to mixing bowl.  Add: ¾ cup grated cheddar, 1 cup breadcrumbs, 2 large eggs (I beat these separately and then added), ¼ tsp basil, ¼ tsp oregano, ¼ tsp parsley.  Mix well.  Spray baking sheet with non-stick spray.  I used a small measuring cup and formed the broccoli mixture into “round patties” and placed on cookie sheet.   Bake 10 minutes, then flip patties over and bake 10 more minutes or until “formed” and slightly golden.
  • Spinach Bites & Mashed Potato Bites should be cooling on a cooling rack.
*At this point your meatballs, chicken parmesan bites and sweet potato fries should be fairly cool.  You will want to “flash freeze” the pieces individually so when you transfer them to the Ziploc bags they won’t freeze together in one big block.  Transfer the pieces to a cutting board or something else that will fit in your freezer.  Make sure they are not touching—put in freezer for approx 1 hour.  If items feel semi- frozen transfer them into respective bags and place immediately in freezer.
3) Lastly, it’s time to bake the breakfast goods
  • I started with (2) mixing bowls.  In the one bowl add the following:  1 ¼ cup whole wheat flour, 1tsp baking powder, ½ tsp salt- whisk together, this is your “blueberry bowl”.  In the second bowl whisk together the following:  1 ½ cups whole wheat flour, ½ cup old fashioned oats, 2 tsp baking powder, ½ tsp baking soda, ½ tsp salt, 1 tsp cinnamon- this will be your “apple banana bowl”.
  • In a separate bowl mash (2) bananas and grate the apple (peel the apple first).  Add 3 Tbsp vegetable oil, ½ c brown sugar, 1 egg, ½ cup milk (I used almond milk) and mix together well.   Add this mixture to the “apple banana” dry ingredients bowl and mix well.
  • In another separate bowl cream together using a mixer (2) tbsp softened butter and ½ cup white sugar.  Add (1) egg, ½ cup milk and 1tsp vanilla.  Mix well.  Add the blueberry flour mixture to the wet mixture and combine.  Fold in (1) cup blueberries.
  • Grease both mini muffin pans – using a medium scoop, fill each muffin cup with respective blueberry OR apple banana mix.  *I had some extra so I actually also filled a regular sized (6) cup muffin tin with the remainder so I didn’t’ waste.
  • Place in oven and bake approx 15 min or until toothpick comes out clean.  Transfer to cooling rack. 
*By this time your spinach cups, mashed potato cups & broccoli bites should be cool- transfer to cutting board and place in freezer to “flash freeze”.
Once muffins are cool- also transfer to cutting boards to “flash freeze”.  Once everything is semi-frozen, transfer to respective Ziploc bags and place in freezer!
When I am ready to “use” the freezer items—I either set them on the counter for about 30 min prior to use and let them thaw OR put them in the microwave on defrost setting for 1min30sec.    Depending on your little ones age- you may want to cut up the items into little finger bites. 

I hope your little one enjoys the food as much as mine does!!

Tuesday, September 17, 2013

Where have I been??

To say that I have been a complete SLACKER keeping up with my blog posts is an understatement- and I apologize for that!  I will say that slacking on the blog is partially because The Test Kitchen has ALSO been slacking!!  

It's funny how your priorities change so quickly after having a baby--- when I get home from work now, instead of coming up with some extravagant meal to eat for dinner I just want to hang with my boy and soak up every second of quality time instead of slaving away in the kitchen!   I am perfectly happy eating a bowl of Cheerios or Chips & Salsa for dinner these days... and my poor Hubs has had tostitos scoops with melted cheese and salsa or a PB&J more nights than I can count on all my fingers and toes in the past couple of months I hate to admit...

But wouldn't you much rather hang out with THIS BOY than cook in the kitchen??


In an attempt to "meal plan" better the Hubs built me a chalkboard in the kitchen-- and I have to say that the weeks we actually write our schedule and menu on it, we eat-- and we eat well!  The weeks we don't write on it-- we don't eat!  WOOPS!  

Lately- our 10 month old has been really enjoying finger foods-- so my time in the kitchen has been dedicated to dicing up every fruit and vegetable imaginable for him, making mini muffins, meatballs ect ect... for the little man-- and by the time he is done with his dinner, I am DONE standing in the kitchen-- thank you Dominos and Pizzettas for delivering to our house and thank you Rucker Johns for the dinner "pick up" lane!!!

I will say that all of the Freezer Cooking I did pre-baby has really helped out because we are down to about 4-5 meals now which is AMAZING they lasted that long!!
Here are the links to my past Freezer Cooking Posts:
Freezer Cooking 1
Freezer Cooking 2
Freezer Cooking 3
Freezer Cooking 4

So my question to YOU my readers-- now that you have hopefully accepted my "slacker" apology-- what recipes do you want to see on the blog?   Quick & Easy, Crockpot, Freezer Cooking, Baby Finger Foods???

Let me know-- and I will try to get back on the cooking bandwagon!

In the meantime-- I think I am going to do a post on the "Freezer Cooking/Prepping" I did for baby this past weekend-- stay tuned!!

xoxo
Melissa


White Chicken Parmesan

My family ate A LOT of Italian food growing up... maybe because my daddio is Italian we all really enjoyed pasta and carbs carbs carbs.   I can't exactly remember when my mom started making White Chicken Parmesan but it is definitely a favorite of mine and we have it at least twice a month!  

This is a "go to" recipe because I always have the ingredients on hand!!
 

White Chicken Parmesan:

Ingredients:
  • 4 Thin Chicken Breasts (I usually butterfly two breasts) pound slightly if needed
  • 3/4 Cup Sour Cream
  • 1 Stick Butter
  • 4-5 Garlic Cloves Pressed
  • Shredded Parmesan Cheese (about 1/2 cup)
  • Salt & Pepper
Method:
  1. Preheat Oven to 375 degrees.
  2. Line a 9 x 13 pan with foil or spray with cooking spray(for easy cleanup after!)
  3. Wash, Trim & Slightly Pound Chicken Breasts.  Place chicken breasts in prepared pan.
  4. Place stick of butter, pressed garlic and a couple shakes of salt & pepper into a microwave safe bowl.  Microwave approx 30-40 seconds or until butter is melted completely.
  5. Add sour cream to butter mixture and mix well.
  6. Coat BOTH SIDES of chicken with the sour cream/butter mixture evenly using all mixture.
  7. Top chicken with shredded Parmesan cheese (you can use more or less than 1/2 cup - personal preference!)
  8. Place chicken in oven uncovered for 30 minutes (or until done).
  9. Serve Chicken with a side of pasta and add homemade marinara from freezer cooking 3 if you really want a YUMMY dish!
** Pampered Chef DEEP COVERED BAKER METHOD:
  • Instead of placing chicken in a foil-lined pan, place it in your deep covered baker and microwave on HIGH 8-9 minutes or until chicken is done. 

Tuesday, March 12, 2013

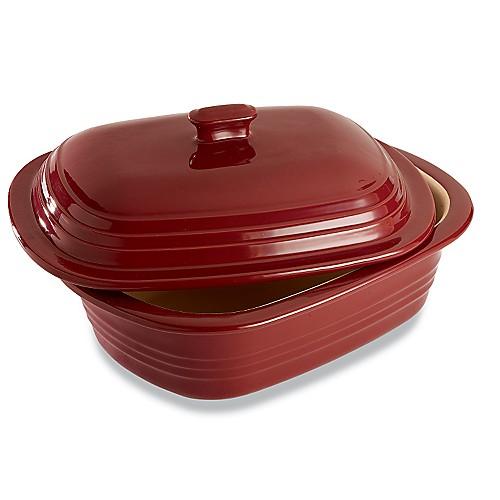
Dinner In 10 Minutes! The Deep Covered Baker- My New Favorite Piece of Kitchenware!

The Deep Covered Baker – My New Favorite Piece of Kitchenware!!


Photo Credit: Pampered Chef
Do you feel like you are constantly rushing around to get dinner on the table and you want something to make your life easier??  If you are thinking "YES!" then KEEP READING!  


I have been a little slack on posting lately… between spending time with my precious 4 month old and going back to work after maternity leave, I have found little (or no!) time to blog!   I HAVE however been putting meals on the table thanks to my Freezer Stash (from Freezer Cooking 1, Freezer Cooking 2, Freezer Cooking 3 and Freezer Cooking 4) AND because of my new found FAVORITE piece of kitchen equipment:  THE PAMPERED CHEF DEEP COVERED BAKER!


I will begin with a little story… back in August I decided to host a Pampered Chef party at my home because I LOVE to cook and thought it would be perfect to host a “cooking show” at my house for friends and family to attend…  I called on the fabulous Jamie Swanson (check out her Facebook Page "What's Cooking with Jamie" for YUMMY recipes!!) to come on over and share some of her favorite Pampered Chef recipes and products.   If you have hosted a PC party then you know that you just have to provide all of the ingredients, and your consultant does the rest as far as assembly, cooking etc….  One of the recipes we were going to prepare (Pesto Tomato Chicken Flat bread) called for 2 cups of cooked chicken… so I had asked Jamie ahead of time if I needed to have the chicken cooked for her when she got to my house… She said not to worry about it and that she would take care of it when she came over… and in my mind I am thinking – "she is coming over about 30 min before the party starts so how the heck is she going to cook the chicken and have it ready in time???"
She arrived at my house and put the 4 chicken breasts in a piece of stoneware with a lid (Deep Covered Baker) and popped it in my microwave on HIGH for 8 minutes… pulled it out and the chicken was cooked PERFECTLY!   I could not believe my eyes!  As if this wasn’t enough… she then proceeded to put an ENTIRE 5 Ib. roasting chicken in the Deep Covered Baker- covered it in a delicious Pampered Chef rub and put it in the microwave for 30 minutes….  I am thinking, "yea right this chicken is not going to be good!  Chicken in the microwave??"  I figured it would end up being rubbery or dry… Moment of Truth:  the chicken came out of the microwave and it looked beautiful and SMELLED delicious!!!  We dug in and the chicken was so moist and flavorful I could not believe it.  I WAS SOLD, I knew I had to have one…
Photo Credit: Pampered Chef


When my Deep Covered Baker first arrived… I was a bit intimidated by it so it just sat on the kitchen counter staring at me for a week or two.  I finally decided to dive into the recipes and buy ingredients so I could start actually using this new piece of equipment that decided to join my kitchen family… the very first thing I used it for was exactly what I had seen Jamie do—make chicken breasts to shred and use in chicken noodle soup!  SO EASY.  The next thing I made was Easy Enchiladas—can we say 5 ingredients and 15 minutes later we were enjoying a delicious meal and my husband couldn’t believe how good the enchiladas were… oh and I forgot to mention that HE made them in the Deep Covered Baker because I was busy feeding the baby!    The other night I had some ground beef I needed to use up so I decided to see what recipe I could make in the DCB that I already had the ingredients for…  I came across a Meatloaf recipe and threw it together in under 5 min- popped it in the microwave for 20 minutes and dinner was done… my husband said it was the BEST Meatloaf he had ever had!  WOW… this Deep Covered Baker is a keeper because it is making life so much easier and keeping food in our bellies!!

Photo Credit: Pampered Chef  

The Deep Covered Baker is really the only reason we actually eat a “home cooked meal” most nights!  Having a 4 month old and a full time job doesn’t leave much time for menu planning, food prep and execution.   It seems like our weeknights consist of my husband and I taking turns with the baby while one of us is running around the house trying to clean up, cook, do laundry, ect… (You ALL know this story!)    My priorities have also changed so much and I would much rather spend an extra 20 minutes with my family than trying to cook a big extravagant dinner that in the end my husband would probably put ketchup on anyways.  The baker has easy recipes that require minimal ingredients and minimal prep–time that you can assemble day-of or the night before.    The baker can be used in the oven OR in the microwave oven.   I have to be honest and say that I have tried almost EVERY microwave recipe in the recipe book, but I have yet to try an oven recipe.  The ease of throwing all the ingredients in the baker and popping it in the microwave for 10 minutes and a delicious meal coming out is like a new modern crock pot or something!   Every family should have a Deep Covered Baker in their kitchen!  

Photo Credit: Pampered Chef
I have been relying on my DCB so much that I actually just purchased a second one so I can assemble 2 meals at once to be cooked during the work week.  I have also learned the “basic” cooking times and concept from using it so much enabling me to adapt some of my own personal recipes and put them in the baker in the microwave!

One thing I haven’t mentioned is if you ever have a sweet tooth- BEWARE, you can put a box of brownie mix in the baker (with the called for eggs, water and oil) for approx 6 minutes and BOOM—you have cured your sweet tooth, which could be dangerous and a good thing all in one!
Photo Credit: Pampered Chef


A couple of my favorite things to make in the Pampered Chef Deep Covered Baker: 

·         Thirty Minute Chicken

·         Chicken Fajitas

·         Chicken Penne al Fresco

·         Quick Chicken Pad Thai

·         Loaded Potato Chowder

·         Beef Tacos

·         White Chicken Parmesan (w/Homemade Marinara from Freezer Cooking 3)

·         Easy Enchiladas

·         Lasagna Soup

·         Meatloaf

·         Taco Soup

·         10 Minute Pork Tenderloin

·         Pork Chops & Rice

·         Touchdown Taco Dip

·         Quick Fudgy Brownies

Moral of the story.... head on over to pamperedchef.com and get yourself a Deep Covered Baker!   You will LOVE IT --- dinner has never been so EASY or AFFORDABLE to put on our table!


*Disclaimer:    No services, products or compensation were given to me for the purpose of this blog post. All opinions are 100% my own. I am disclosing this in accordance with the FTC guidelines.


Saturday, December 1, 2012

Freezer Cooking # 4: Soups!


My Freezer after Freezer Cooking #4

About a month and a half ago I asked for reader suggestions on soups I should include in my Freezer Cooking #4 post. Thank you everyone for your suggestions! Sorry it has taken me awhile to finish this post… Our baby boy arrived 10/22/2012, so needless to say I have been a bit pre-occupied this past month!

The concept for Freezer Cooking #4 is to fully prepare 4 different soups that you can easily thaw & serve within 30 minutes of taking out of freezer and 1 that you will “prep” to be placed in the crock pot. For this freezer cooking we will be doing a White Bean Chicken Chili (Thanks Holly Shaw for this delicious recipe!), a Beans & Greens Soup, Apple Chicken Stew, Perfect Winter Beef Stew (Thanks Pam Fallis for this amazing recipe!) and Chicken & Andouille Stew.

As I point out in all my Freezer Cooking posts, I prepare my “bags” to be for “2 servings.” Since there are only 2 of us eating…this helps with waste & portion control. If you will be serving more than 2 people with your freezer meals then you can cut the # of bags I tell you to prep for each soup in half so that each bag has more soup. ( i.e. – I will tell you to label 3 bags for “White Bean Chicken Chili”, these bags will have enough for 2 servings each in them when the prepared soup is divided equally between them, so if you would like your bags to have 4-6 servings, then divide the soup evenly between 2 bags instead of 3.)
Also, I will be using my FoodSaver system to seal/store all of the soup ingredients. For the sake of the instructions and so no one gets confused I will still refer to everything as “bags.” For this round of recipes you will need Quart sized freezer bags if you follow my instructions how they are OR Gallon sized bags if you are increasing serving sizes to (4).
Here is the menu for Freezer Cooking Round 4 “Soups”:
• White Bean Chicken Chili (3)
• Chicken and Andouille Stew (4)
• Greens & Beans Soup (2)
• Perfect Winter Beef Stew (3)
• Apple Chicken Stew (3)
Here is my grocery list: (don’t be alarmed! The list looks a bit long but most of the ingredients were already in my cabinet and are probably in yours! Everything in italics was already in my cabinet. Compare this list to your cabinets and cross out the items you won’t need to buy at the store. =) )
Fresh Produce:
• Sweet Onions (5 med/large sized) I bought a “bag” of sweet onions- it was less $
• Head of Garlic (1)
• 1-Green Pepper
• 1-Red Pepper
• 1-Bunch of Celery
• 1 Ib. Carrots (for slicing)
• Bag of Potatoes (you will need approx 6 potatoes)
• Fresh Sliced Mushrooms (3 cups)
• 1- Large Apple
Meat:
• 2 Ibs Beef for Stew
• 4 ½- 5 Ibs Chicken Breast
• 1 ½ Ibs Fully Cooked Andouille Sausage (Link)
Bacon (approx 6 slices- I use the pre-cooked/microwavable kind)
Grocery:
• 64 oz Chicken Broth
• 42 oz Vegetable Broth
14 ½ oz Beef Broth
Worcestershire Sauce
• KRAFT Zesty Italian Dressing (3/4 cup)
• 15 oz Tomato Puree
• 15 oz Stewed Tomatoes
14 oz Diced Tomatoes
• 11 oz can White Corn
• (3) 15 oz cans Great Northern Beans (white beans)
• 4 oz diced green chilis (can)

• Brown Rice (not instant)
• Packet White Bean Chili Seasoning Mix
Cajun Seasoning
• Salt & Pepper

• Canola Oil

• Olive Oil

• Flour

• Bay Leaves (3)
• Basil

• Sour Cream

• Garlic Powder

• Thyme

• Caraway
• Apple Cider or Juice
Apple Cider Vinegar
• Freezer Bags
The following ingredients you will need for later when you actually prepare the soup: Shredded Parmesan Cheese, Spinach or Kale, Green Onions
Of course, once you get everything home and you are ready to cook put it on the counter and admire what you are about to do!! =)
I label everything with name, date and instructions BEFORE I start:
• Chicken & Andouille Stew (4 bags): Thaw in Fridge or Sink- Warm & Serve over Rice, top with Green Onions
• White Bean Chicken Chili (3 bags): Thaw in Fridge or Sink- Warm & Garnish with Cilantro & Sour Cream
• Beans & Greens Soup(2 bags): Crockpot Low 5 Hrs/High 2.5 Hrs. Add 4 cups chopped spinach or kale just before serving. Sprinkle with Shredded Parmesan.
• Perfect Winter Beef Stew (3 bags): Thaw in Fridge or Sink- Warm & Serve
• Apple Chicken Stew (3 bags): Thaw in Fridge or Sink- Warm & Serve
Now it’s time to get started on the soups!
1. First, you want to assess your “pot” situation. You will need (2) LARGE pots for the Perfect Winter Beef Stew and the Chicken & Andouille Stew and (2) Crockpots for the Apple Chicken Stew and White Bean Chicken Chili. We will prep the Beans & Greens soup so that the ingredients are frozen together and then you put in crockpot to cook the day you will eat it. Get your pots/crockpots ready on the counter/stove. ( I label my pots so I know which soup is which for easy ingredient placement)
2. Next, I washed and prepped ALL the meat. For the Chicken; Wash and trim all breasts, leaving whole and set aside. Cut (3) Pieces of Chicken (approx 1.5 pounds) in half and rub with a mixture of 1 Tbsp Cajun Seasoning, ½ tsp salt and ¼ tsp pepper, set aside. For the Stew Beef; make sure it is cut into 1 inch chunks. Pour ¾ cup KRAFT Zesty Italian Dressing over stew beef – coat evenly and set aside letting marinate 30 minutes. For the Bacon; cook approximately 6-8 slices and chop, set aside. For the Andoiulle Sausage: Slice and set aside.
3. Now we will prep all the vegetables. Chop (4) Onions and Halve & Slice (1) Onion, Slice 10 Carrots, Chop the Green Pepper & Red Pepper, Chop 4 Celery Ribs, Mince 6 Garlic Cloves, Peel & Cut 6 Potatoes into cubes/chunks. *I use my onion chopper to chop the onions, green pepper, red pepper and celery- it makes it easier!
4. In the “Chicken & Andouille Pot” heat 2 Tablespoons of canola oil and brown the (3) chicken breasts rubbed in Cajun seasoning (you can do this in batches if you need to). Remove chicken from pan and set aside. Add ½ cup canola oil to same pot and stir in ½ cup flour. Cook & stir on medium-low heat for 30 minutes or until browned (do not burn).
5. While oil/flour is cooking in “Chicken & Andouille Pot”, you can start on the “Perfect Winter Beef Stew Pot”. Warm (1) Tbsp oil over Medium-High heat and cook (1) chopped onion and 3 cups mushrooms for approximately 10 minutes or until tender. Remove beef stew meat from marinade(discard marinade) and add meat, approx 6 of the sliced carrots, 2 of the cubed potatoes, 14 ½ oz can stewed tomatoes, 14 ½ oz can beef broth and bacon to pot. Stir. Bring to a boil stirring occasionally and cover. Reduce to low heat and simmer 1 hour 15 min or until beef is cooked and sauce is thickened.
6. In the “Chicken & Andouille Pot” once flour/oil mixture is browned add 1 chopped onion, chopped red & green peppers and 2 ribs chopped celery. Cook & Stir approx 3-4 minutes or until vegetables are tender. Add 4 cloves minced garlic and cook 1 minute longer. Gradually add 4 cups water, 2 cups chicken broth, 1 Tbsp Cajun Seasoning, ¼ tsp pepper and ½ tsp salt, 2 Tbsp Worcestershire Sauce, 2 Bay Leaves, (3) Browned Chicken Breasts and Sliced Andouille Sausage. Bring to a boil. Reduce heat; cover & simmer for 1.5 hours or until chicken is tender. Once chicken is tender- shred and return to soup. Discard Bay Leaves.
7. While the above soups are simmering, assemble the crock pot soups:
White Bean Chicken Chili:
- Mix all of the below together in largest crockpot and cook on High 4 hours or Low 8 hours.


 32 oz chicken broth

 11 oz can white corn
 2- 15 oz cans Great Northern Beans (white beans)
 ½ cup sour cream
 1 chopped onion
 1- 4oz can green chilis
 1- 14 oz can diced tomatoes
 1 tsp garlic powder
 1/8 tsp pepper
 1 packet White Bean Chili seasoning mix
 3 Chicken Breasts (approx 1.5 pounds)
 Shred Chicken once Chili is done.
 Apple Chicken Stew Crock Pot:
 In Crockpot Layer the following:


 4 Sliced Carrots
2-4 potatoes (cubed)
 1 Sliced Onion
 2 Chopped Celery Ribs
 Combine 1 ½ tsp salt, ¾ tsp dried thyme, ½ tsp pepper, ¼ tsp caraway seeds and sprinkle half over vegetables.
 3-4 chicken breasts
 1 large apple cubed
 1 ¼ cups apple cider or juice
 1 Tbsp cider vinegar
 1 bayleaf
 Remainder of salt/thyme/pepper/caraway mixture
 Cook on High 4 hours or Low 8 Hours. Shred Chicken when done, remove bay leaf.
8. Now that all of the above are prepped we will make the Beans & Greens bags:
 You should have (2) Bags Labeled Beans & Greens Soup.
DIVIDE the following ingredients between the 2 bags:
 42 oz Vegetable Broth
 15 oz tomato puree
  15 oz Great Northern White Beans (drained and rinsed)
 ½ cup uncooked brown rice
 1 chopped onion
 1 tsp basil
 ¼ tsp salt
 ¼ tsp pepper
 2 garlic cloves minced
 Squeeze excess air out of bags and place in freezer flat.
Once all of your soups/stews have simmered & cooked for the noted times let cool.  (I put in fridge overnight before distributing amongst bags- easier to handle cold soup that HOT!)
Distribute soups/stews evenly amongst # of prepped bags.
I usually put them in the freezer stacked as flat as possible on top of each other for easy storing.
I typically take the soup out of the freezer and place in the sink in luke-warm water for about 15 minutes and then transfer from the bag to a pot and warm & serve.
ENJOY!!!


Saturday, November 24, 2012

Slow Cooker Easy Pot Roast

I have been "craving" a good ole' Pot Roast in the crock pot for a couple of weeks now so I finally decided to buy the ingredients and make one today!   I have to admit that I have tried 10+ different pot roast recipes and no matter how many steps or what ingredients are called for, they always taste the exact same and leave me wanting for "more".  When assembling the roast this morning, I didn't use a recipe- I just threw some things in the crock pot and let it cook and the hubs and my parents all gave the finished product their approval and said it was delicious!  Of course... I had to share what I did because it was super simple!  Enjoy!

Slow Cooker- Easy Pot Roast
Serves 4-6

Ingredients:
  • 2 1/2 Ib Beef Roast ( I used a Shoulder Cut)
  • 4 Red Potatoes (or potato of choice) washed & cubed
  • 2 Medium Sweet Onions, cut into wedges/chunks
  • 2 Celery Ribs, chopped
  •  6 Carrots, peeled & cut into chunks
  • 1/2 Packet Italian Dressing Mix
  • 1/2 bottle Kraft Zesty Italian Dressing
  • 3/4 Cup Beef Broth
  • Salt & Pepper
Method:
  1. Place Roast in a Ziploc bag or medium sized dish and cover with Zesty Italian Dressing on both sides- let marinate while prepping the rest of the recipe.
  2. Prep all vegetables per above instructions and place in bottom of large crock pot.
  3. Add beef broth, 1/2 cup zesty Italian dressing and 1/2 packet Italian dressing mix to crock pot over vegetables.  Toss well to coat.
  4. Place marinated beef roast on top of vegetables along with extra marinade.
  5. Sprinkle lightly with salt & pepper.
  6. Cook on Low for 7-8 hours or High 3-4 hours of until vegetables are tender and beef is cooked through.
  7. Enjoy!

Monday, October 8, 2012

I NEED YOUR INPUT for Freezer Cooking #4!!

I am prepping to do a Freezer Cooking #4: "SOUPS"  this weekend in preparation for the cooler fall/winter months!

I would love to hear from my readers about the soups they would be interested in seeing on the recipe list this time around!

My plan is to do 4-5 different soups and doing a double batch of each which will come out to about 16-20 "soup" meals in the freezer!

Leave your comments with your soup suggestions!

xoxo
Melissa =)